Showing posts with label swisstrax. Show all posts

Saturday, September 20, 2014

New Southern Man Cave

One of the outcomes of the build is the New Southern Man Cave (NSMC). One of the really big problems with living in a northern state is winter. It cuts down on driving days and building days. Even with a propane based bullet heater, there are three to four months out of the year where it is too cold in the garage to get much done.

The second problem (not for the build, but afterwards) is that running three or four cars in two car garage is not a long term solution. Granted, I have a storage space for one car (usually the Boxster) in northern Minnesota. I have been truly blessed to have that space. The prospect of parking either the Boxster or the GTM outside just doesn't work for me.

My wife and I decided (basically, I got permission, but decided sounds so much better) to build the New Southern Man Cave in South Carolina. There are about 10 to 15 days per year where the weather is truly horrible. I can congregate all the cars in one place, and we get the lift out of the Northern Man Cave - something the love of my life will truly appreciate. She's been a really good sport about having a lift shoehorned into the garage, but all things come to an end.

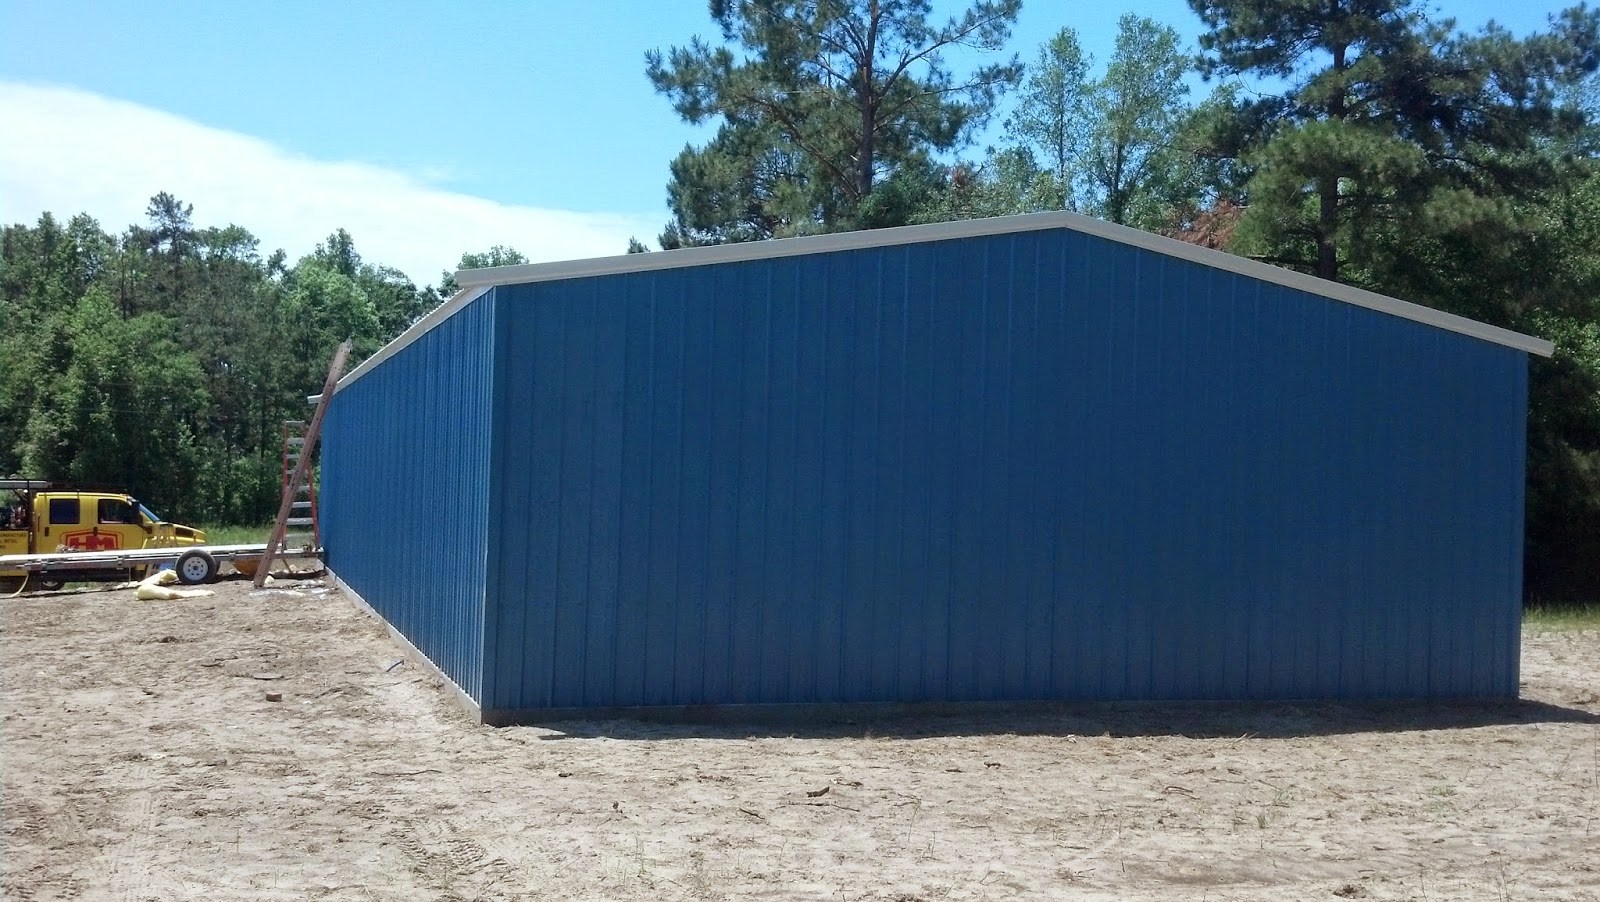
The New Southern Man Cave is located on a former bean field about 20 miles inland from the Grand Strand. It is 75 x 30 feet (2250 square feet) with a clearance of just under 11 feet. It has sufficient space to park the Boxster, Corvette and GTM, a paint booth that can be taken up and down, tool chest and work bench, the lift, electric hoist, small welder and air compressor. Plus, it could hold additional project car (or two - I wrote the last bit really quietly).

*     *     *
When I started this post, the NSMC was in the planning stages. Somewhere in between planning, building and moving the build from Minnesota to South Carolina life stepped in. My mother suffered a fall in April 2014, and a good chunk of the summer went to dealing with the crisis. She is much better now. Needless to say, between family issues and running a business, the GTM build took a back seat.

The NSMC was completed in May. I only had a week to set up things in May, before heading back to Minnesota. By the end of summer, the GTM and Boxster joined the Corvette; the lift was reassembled, an overhead hoist for the engine and body was installed; a ground winch was bolted into the slab; and Internet service was established. The move was not trivial, but I worked with a number of great vendors:

  • Benco - The original vendor that I purchased my four post Direct Lift from in 2011. They came and dismantled the lift, then shipped it to South Carolina.
  • Quality Air Tool -  I was very fortunate to find the nearest Direct Lift vendor to the NSMC was in Florence, SC, which is 50 miles up the road from the NSMC.
  • Select 1 -  These folks transported the cars to the NSMC. They showed up on time, demonstrated great care  car for the vehicles they were moving and delivered them on time. They were recommended to me by my wife's cousin.
  • Homewood Metal - These folks built the NSMC. Mr. Jimmy is a gentleman, true to his word and schedule. The NSMC is absolutely fantastic!
This required planning, timing and money. So nothing major happened on the build this summer. The neighbors near the Northern Man Cave are disappointed with the move. They wanted to see the car run, but in reality it would have been very difficult to do all the required body and engine work on one side of a double garage that already has a lift and a car. The rest is a pictorial of the NSMC and the move.

This is mid April, 2014. The steel frame is going up.

Early interior shot, early May 2014. The building is fully insulated.

Early exterior shot, early May 2014.


Moving Day. This was late July 2014.

She had to be winched into the truck.

Settled in for the long ride.
Early August 2014 - Arrival day in South Carolina. The drivers for Select 1 are fantastic.

This car that has smudged primer, no engine and no glass attracted a HUGE amount of attention. This was the first time it had ever been out of a garage and I was able to take photos from a number of angles.

No one really knows what a Factory Five GTM is. So I explain it is based on a C5 Corvette, with the engine the rear hooked up to a 7 speed Porsche transaxle with some Ferrari like styling. Then they ask, how fast can it go. I explain that the estimated top end speed is 207 mph. I'll never take it that fast, but that's what my calculations estimate.

Did I mention friends? This is Charlie, my neighbor from Richmond, VA. He helped me get the GTM into the NSMC. He was so happy to find out the towing package on his SUV really works.

My son in law made the Corvette photos for my birthday.
This is the Swisstrax floor from the Northern Man Cave. I picked it up, put  it in the Van and reassembled it.


All the cars in one place and plenty of space. You can see the rolling bench next to the GTM. I was very busy getting things put together.

Just before Labor Day, the lift arrives!
The lift is back in business.

Of course, it wouldn't be complete without the Lift Lytes. One of the best accessories for any lift.

Overhead hoist (Northern Tool and Equipment) for the engine and body work. Essentially, I can do everything as a one man shop.

We all have to answer to someone. I answer to 9 lbs of Attitude.

The lift went to use immediately. The Corvette goes up for some much need maintenance.
There was never any room in the Northern Man cave for a rolling bench. Now there is plenty of room.

Long shot of all the cars.

My grandson, Zachary, came to help me get the GTM covered. He is really into cars.

Saturday, June 30, 2012

Kit Disassembly


<< Physical Inventory                                                                 Steering Rack  >>


Major System Category: Misc
Task: Dismantle the kit
Parts: Everything attached to the chassis as delivered.
Prerequisite Tasks: Physical Inventory
Additional Costs: N/A
Time Requirement: Depends, but budget 3 to 6 hours
Date Started: June 29, 2012
Date Completed: June 30, 2012

If you go to the manual, it talks about taking the body off as the first task. Except there are a number of things you need to do before you get there. The GTM is shipped with the doors, hatch, hood, front and rear glass attached to the chassis. I think a fair estimate is this weighs around 600 lbs. (My drive has an incline, so it felt like 600 lbs when we rolled it up from the truck.)

Consideration: The front and rear glass is not packed away in a padded box. You need to think about how you are going to safely store these pieces until you need them.
The body is off the car and sitting on my Swisstrax floor. This polymer/plastic surface  is a perfect resting place for the body.
The reason the car looks like it is put together on delivery is because the doors, hatch, hood and glass are duct taped together. I started with the doors, moved to the rear glass, then the hatch. Inside the hatch, I discovered the diffuser taped to the chassis. Inside the car, the roof scoop and splitter can be found resting in the cockpit. The hood weights between 50 and 60 pounds, and it is a little ungainly so you might want an extra set of hands.
This parts bin costs about $8 at Harbort Freight. The last time I was in Myrtle Beach , I picked up three of these. I have one dedicated to the GTM build. It has come in very handy as I removed the panels from the chassis.
Consideration: The front glass is going to slide down once the duct tape is removed. This weighs between 30 and 40 pounds. The last thing you want to do is break the windshield on day one.

The main body shell is secured to the chassis by eight screws. The screws are a mix of 6mm and 8mm. Technically the front screws are attached to a sheet metal piece, but you want to detach this anyway. The other screws are located in each door sill and the rear license cavity. This is where the manual starts! Once the body shell is off the car, it is possible for one person to move the body shell as long as you stand in the hatch and lift. The tail end is heavier so your balance point is further back than you would expect.
Front view of the chassis resting on the lift. At the bottom of the chassis you can see the inline jack. This has three physical locking points, so you are relying on the hydraulics. The chassis is five feet wide and easily straddles the lift.
Get your smartphone or camera ready - it's picture time. You need to remove all the aluminum panels. There are more than it seems and a gazillion screws (maybe 150) to unscrew. This is going to take a while. I took pictures, marked each panel and separated them into two piles: powder coating and left alone. Powder coating is entirely optional.

Consideration: Due to space considerations, I had a need to move the chassis. Home Depot makes these $20 furniture dollies rated to 1000 lbs. I had one and purchased a second. If you decide yo drop her on the furniture dollies, then remove the front aluminum panels; otherwise they will interfere with the floor jack.
This is the Home Depot furniture dolly. This really bailed me out today.
Once on dollies, I could move the car around the garage. Those dollies kept the chassis at the same level as my lift, and after I shed all the excess weight (I am guessing the bare chassis is 200 lbs), I was able to get the chassis on the lift by myself. It was a lot easier than expected. The inline jack and reinforced tray helped a lot too.
Side view of the chassis. The front is on the left. It is easier to see the inline jack circular pad holding the corner of the frame. The red jack stands show where I am supporting the rear of the car.
One thing that didn't go according to plan was my storage solution for the body. The pulley system I devised just wasn't working. The 90 degree heat and getting tired probably contributed to my decision to rethink body storage. Those dollies came in handy. I placed them right at the forward edge of the wheel wells, and pushed the body sideways under the lift against the wall. It isn't an optimum solution, but I can park the Boxster, the Camry and the GTM in the garage. That was the goal.


Thursday, November 17, 2011

Garage Prep III

This is the final phase for garage prep prior to ordering the GTM chassis. I installed a Swisstrax floor at the build site. In the post entitled Synergy I discussed Swisstrax flooring. If you decide to install a floor like this, list Traci as your sales person. She has handled 4 orders for me, and they all arrived perfect.

Finished product. The Maple Grove build site for the GTM.

Neither the Swisstrax floor or the DirectLift car lift are requirements for the GTM. They are both designed to make the build space more usable. The Swisstrax floor is virtually indestructible. It doesn't mar from jack stands or ramps. It doesn't come apart when a car drives on/off repeatedly. It doesn't fade under bright sun (and South Carolina has plenty of that). It doesn't scratch your painted parts.

DiamondTrax tile.
Each tile is a mixture of polymers and rubber, and each tile has a compression strength of 5120 psi. This floor is more forgiving than concrete, and I have no illusions - things will get dinged and nicked during the build. Hopefully, the Swisstrax floor will mitigate some of my clumsiness.

This is the bottom of a tile. You can see it is designed to handle a significant load. In my case, the weight of the lift is dispersed to four load points and the weight of any car I might put on there is equally distributed to those load points. The lift weights 1700 lbs and the heaviest car I might put up there is 4000 lbs. That comes down to 1600 lbs per load point - well within spec for the titles.
I chose the DiamondTrax pattern, because it provides grip and prevents things from just wandering away. It is available in fourteen colors. Once you've selected the product and have measurements, go to the floor designer and build your floor. The designer is a HTML WYSIWYG tool. When you're satisfy request a quote. Get the estimate, pay the bill and wait for FedEx truck to arrive.

Th edge pieces are about 2 inches wide and provide a nice ramp edge to the floor.
Assembly is a snap. The tiles fit together per the plan you submitted. For tools you need some gloves, knee pads, rubber mallet and a cutting tool (I'd suggest the Dremel Multi Max or one of its clones). I finish off the job with end pieces to give me a tapered edge.

Saturday, October 29, 2011

Garage Prep II

Last July (before I wandered to South Carolina for grand kids and stuff), I went to the Cars & Coffee event at the autoplex. This is a wonderful facility located in the western suburbs of Minneapolis. One of the garage owners was kind enough to talk to me about his lifts. He had two Direct Lift four post lifts rated to 8000 pounds. He had a Corvette on each lift and some other cars underneath. (Once you see the Corvettes, what else is there to talk about?)
Front posts will end up against the garage wall.
My garage is deep and it has a 10 foot ceiling. The Boxster is 45 inches tall and the GTM is 42 inches tall. I don't have a lot of room to work with, so I need to leverage the space I have. A four post lift does not have to be bolted to the floor. This is very convenient, especially if you end up moving it.
Rear posts.
My major concern was clearing the garage door hangers. The lift does me no good if it interferes with the garage door. So I spent considerable time measuring the garage, and checking to see if I cleared the garage door. I marked the approximate post locations with chalk, then put wheel chocks as markers (I have a very understanding wife).
Installed and in place.
The lift weighs 1700 pounds. Benco (the Direct Lift distributor for the Midwest) delivered and installed the lift. It was painless. The installers told me that they have put lifts in smaller spaces than my garage, and it wasn't unusual to see one of these in a residential setting.
I also ordered an in line jack for the lift. This is a hydraulic jack that can extend to the car's jacking points and lift vehicle while on the lift. There is an additional plate that will support the car's weight where I use for tools, jack stands and supplies. In addition, there are plastic drip plates that can be spread so your super cool sports car doesn't do anything unpleasant to your other super cool sports car parked below.
I have the system plugged into the same 110 VAC outlet used for the garage door opener. It is a closed system that operates on hydraulics and inch thick cables. It doesn't go up and down real fast, but would you really want to be lifting your pampered petrol burner really fast?
These ramps are detachable. They work fine for low profile vehicles, and my Boxster with the  GT3 style front is very low profile.
The plan is to put the GTM on the lift. Use the bay underneath to park the Boxster or the Camry. Before the GTM arrives, I hope to get the Swisstrax floor installed.
I can take the lift to maximum height with the Boxster on top, and I can stand under the car without feeling like I'm about to smash my noggin on something.
The four post lift is not a requirement for the build. However, I think it makes the project more doable. I have spent the last couple of years flat on my back, working on the Corvette and Boxster using a combination of Race Ramps and jack stands. It was extraordinary to examine the bottom of the car from this perspective. Things that seemed incredibly awkward now are very straight forward and easy to accomplish. I need that edge to help make the GTM project a success.


Saturday, June 18, 2011

Synergy

I'm zooming down I94 in the Boxster (freshly liberated from storage at the Barn), thinking about integrating GPS into an 11 year old car. I have a very nice Garmin Nuvi on a pedestal mount that I use in the van and the Boxster. Unfortunately the pedestal mount tends to land in the passenger seat on tight turns at speed.

Somewhere north of St. Cloud, it hit me. The Escort SmartMirror is the solution. All I need is power to make the SmartMirror to work, and there is power 2 inches from the mirror mount. The research for my previous post After Market Goodies gave me the answer.
Myrtle Beach Garage
Maple Grove Cave
Another preparatory step is getting the garage ready for the build. The idea of being on the back under a car on a concrete floor in the midst of a Minnesota Winter just doesn't do it for me. I plan to install a non-skid Swisstrax floor. I already know that it works. I have installed this floor in Myrtle Beach garage and the Maple Grove cave. I have had the Corvette on jack stands multiple times. There is no skids, slips. Each tile is rated to 6000 lbs. Neither floor took more than 4 hours to put down.

If you go with a Swisstrax floor, list Traci as your sales agent. She has done super job on my orders!
Search Engine Submission - AddMe